Print layout software for packaging
Print layouts: one die, N impressions, every cut dimensioned
A print layout is the drawing a carton shop runs from: the sheet, the blank stepped across it, the guillotine lines that cut the sheet into pieces, and the dimensions the guillotine operator sets. This page explains the parts of one and shows Magpie drawing it from the blank alone.
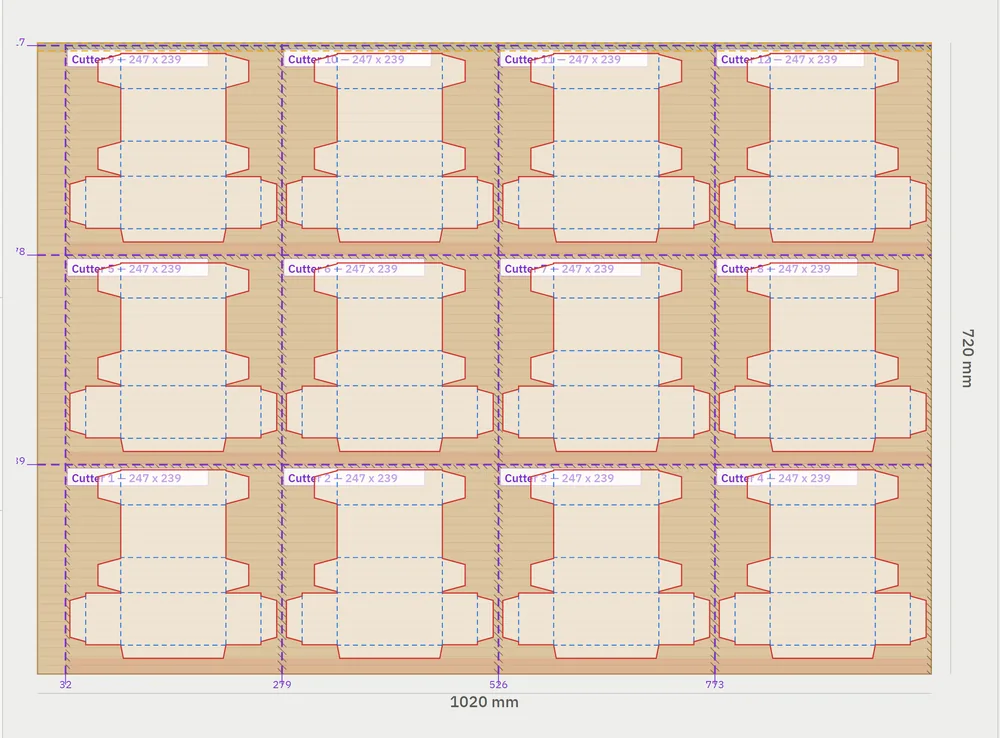
What a print layout is
Folding cartons are printed on a big sheet and cut on a smaller press. Between the two sits the guillotine. The printer prints the whole sheet; the guillotine cuts it into pieces; each piece goes through the platen, where one cutter, the die, cuts and creases one blank. The drawing that ties those three steps together is the print layout, PLO for short in the trade, and it is drawn once per job and kept.
A print layout answers four questions that a plain nest does not:
- Where the grip is, so nothing is printed or cut where the press holds the sheet.
- Where the lay is, so every piece registers off the same edges the sheet did.
- Where the guillotine cuts, as a list of distances the operator sets on the back gauge.
- What one piece is: the blank, plus the room the cutter needs around it, so one die serves every piece.
Print imposition software answers the printer's version of this for pages. Packaging nesting software usually answers the cutter's version for a whole sheet under one die. A print layout is the third case, and it is the common one for short-run cartons, labels, sleeves and blister cards on a platen.
Grip
The grip, or gripper edge, is the front edge of the sheet that the press grips to pull it through. Nothing prints in it, and because the sheet is registered from it, nothing should be cut in it either. On a B1 press the print grip is typically 10 to 18 mm; the cutter has a grip of its own, often 12 to 15 mm on a platen, since the die-cutter grips each piece in turn.
The rule Magpie applies is the one a layout draughtsman uses: each edge keeps the larger of the print tolerance and the cutter tolerance. The piece on the print grip edge keeps the print grip, which is the larger. Every piece a cut makes keeps the cutter's own grip. In the layout above that is why the pieces are 239 mm deep and not 236: an 18 mm print grip, the 215 mm the blank measures up the sheet, and a 5 mm back tolerance, rounded up to the millimetre.
Lays
The lay, or side lay, is the edge the sheet is pushed against to register it sideways, on the press and again on the guillotine and the platen. A print layout is built out from the grip edge and the lay edge so that every piece carries a registered edge into the cutter. The remainder of the sheet, whatever does not divide evenly into pieces, is left as offcut strips at the far edges, where it comes off in one cut and never reaches the platen.
In the layout above the pieces run from the right edge and from the grip; the 32 mm strip is on the left and the 3 mm strip is at the back. Turn the lay to the other side and the strips move with it. The cuts change, the pieces do not.
Guillotine
A guillotine makes one straight cut right across the stack. It cannot stop halfway, so every cut in a print layout runs from edge to edge, and the pieces are always a grid: so many across, so many down. The operator works from a list of back-gauge settings, each a distance from the grip edge or the left edge, and cuts in an order that keeps the registered edges on the pieces.
That list is what Magpie dimensions. Each cut is labelled with its distance from the grip edge or the left edge on the board, exported on a GUILLOTINE layer in the DXF, and printed in the PDF report. A shop with a cut list already knows what to type; a shop without one gets it from the report. Where a shop draws the pieces rather than the lines, the edges of the pieces are the cuts, and Magpie reads a layout drawn either way.
| Cut | Setting | Measured from |
|---|---|---|
| 1 | 32 mm | the left edge (the offcut strip) |
| 2 | 279 mm | the left edge |
| 3 | 526 mm | the left edge |
| 4 | 773 mm | the left edge |
| 5 | 239 mm | the grip edge |
| 6 | 478 mm | the grip edge |
| 7 | 717 mm | the grip edge (3 mm strip above) |
One die, N impressions
The piece is the cutter. A piece is the blank plus the tolerances around it, rounded up to the millimetre, and every piece on the sheet is the same size, so one die cuts them all. One die to make, one make-ready, one tool to pay for, however many impressions the sheet carries. That is the arithmetic of a print layout, and it is why a shop will cut a sheet into twelve pieces rather than buy a die the size of the sheet.
The worked example on this page:
| Sheet | 1020 x 720 mm | oversize B1, grain free |
|---|---|---|
| Blank | 215 x 236 mm | a straight tuck end carton |
| Cutter tolerances | 15 and 5 mm | grip, then back, left and right |
| Print grip | 18 mm | the larger, so every piece keeps it |
| Largest piece | 400 x 300 mm | what the platen takes, so the sheet is cut up |
| Piece | 247 x 239 mm | the blank plus its tolerances, rounded up |
| Layout | 4 x 3 | twelve impressions of one cutter |
| Offcut | 32 and 3 mm | strips at the left and the back |
Magpie weighs the tiled layout against the alternatives, a sheet cut into halves or thirds, or the whole sheet under one big die, by the sheets the order needs and then by the number of cutters. Where the cutter has a largest piece it can take, that bounds the choice. Where it does not, seven guillotine cuts to make what one die would make in one hit is seven cuts for nothing, and Magpie says so.
Drawing one in Magpie
- Drop the blank as a DXF, CF2, PDF or SVG. One design, any quantity.
- Choose the sheet and set the tolerances: the cutter's grip, back, left and right, and the print grip if the sheet is printed.
- Under cutter layout, choose sub-sheets and give the largest piece the cutter takes. Leave across and down on auto.
- Nest. The board shows the pieces, the impressions and every cut with its dimension. Drag a cut if the shop sets it differently, or add one across or up.
- Export. The layered DXF carries a GUILLOTINE layer alongside CUT and CREASE; the PDF report carries the cut list, the sheet count and the cost.
Have an old layout drawing? Upload it as it is. Magpie recognises a sheet with one blank repeated across it and the guillotine lines between, takes one impression out of it, and nests that blank on whatever sheet you are running now, starting from the cuts you already know.
Words
- Print layout, PLO: the drawing of a printed sheet, its pieces and its guillotine cuts, for cartons and other die-cut work.
- Imposition: the printer's word for placing pages on a sheet. A print layout is the die-cutter's counterpart.
- Step and repeat: one blank stepped across the sheet at a fixed pitch. A print layout is a step and repeat with the pieces and cuts drawn on.
- Guillotine layout: a layout whose pieces are made by straight cuts right across the sheet, so the pieces form a grid.
- Dieline nesting: placing dielines, or blanks, on a sheet. Packaging nesting software does it under one die; a print layout does it one piece at a time.
- Impression: one pass of the die. Twelve pieces from one cutter are twelve impressions.
What Magpie does in each of its three modes, and what it costs.
Drop a blank and see the layout. Sign in only when you download.
Open Magpie